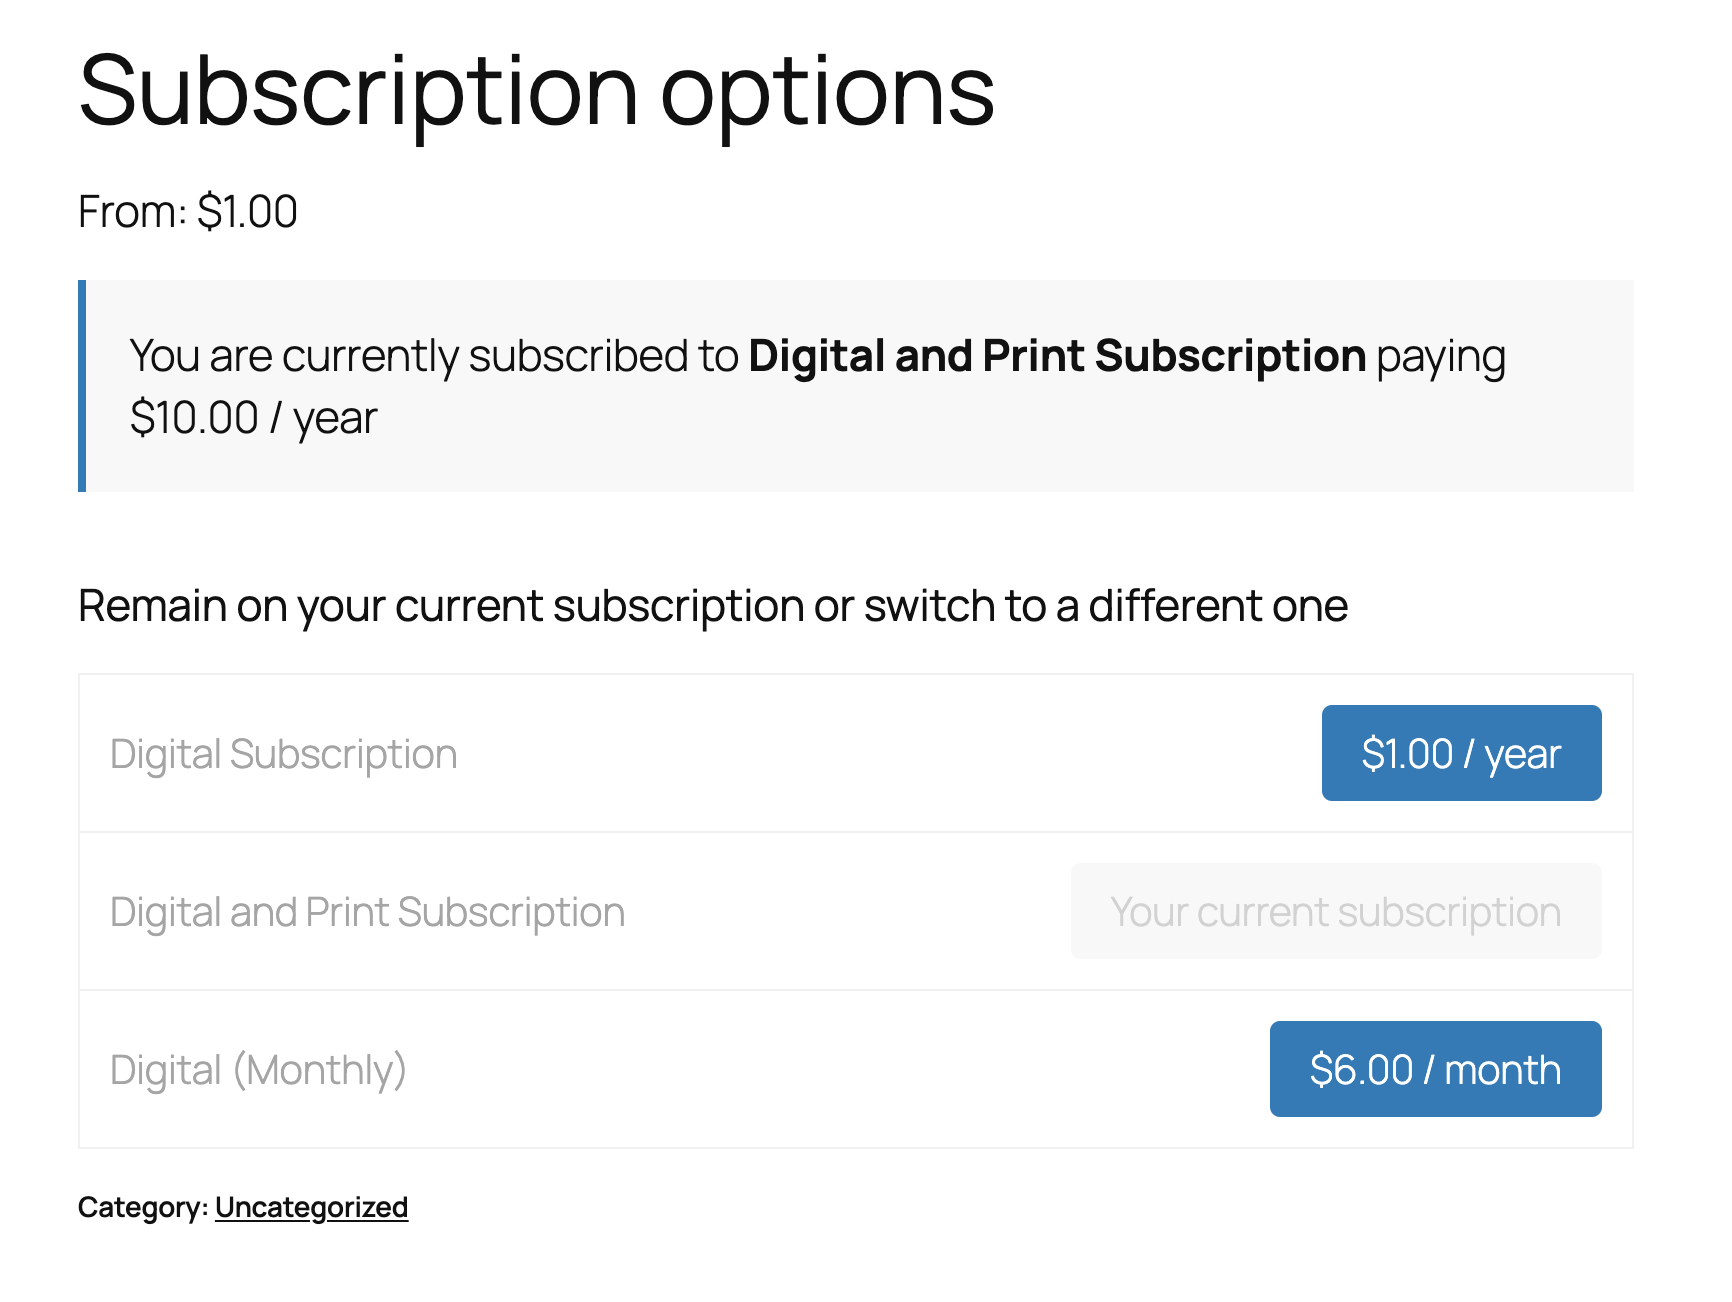
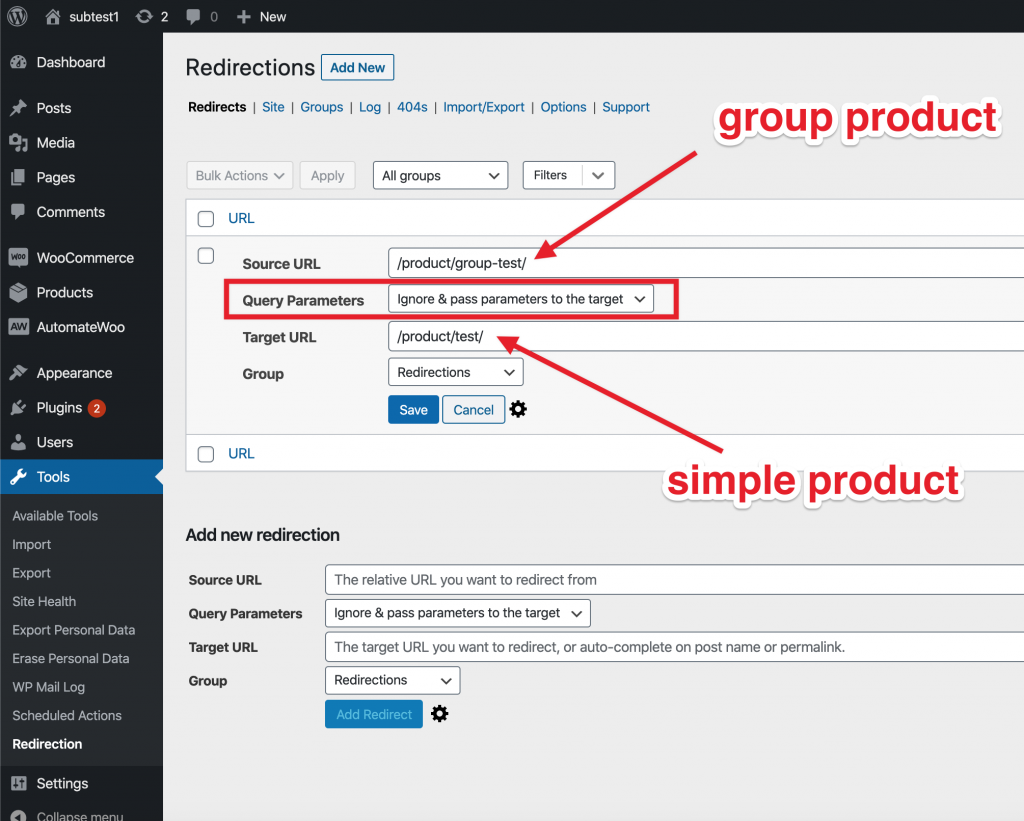
This free plugin overrides the grouped product template during a subscription switch so that there is a nice button interface showing the prices and which one is current.
Plugin: Better Subscription Switching Buttons
A WordPress plugin that improves the subscription switching experience in WooCommerce Subscriptions by providing a cleaner, more intuitive interface for switching between subscription plans.
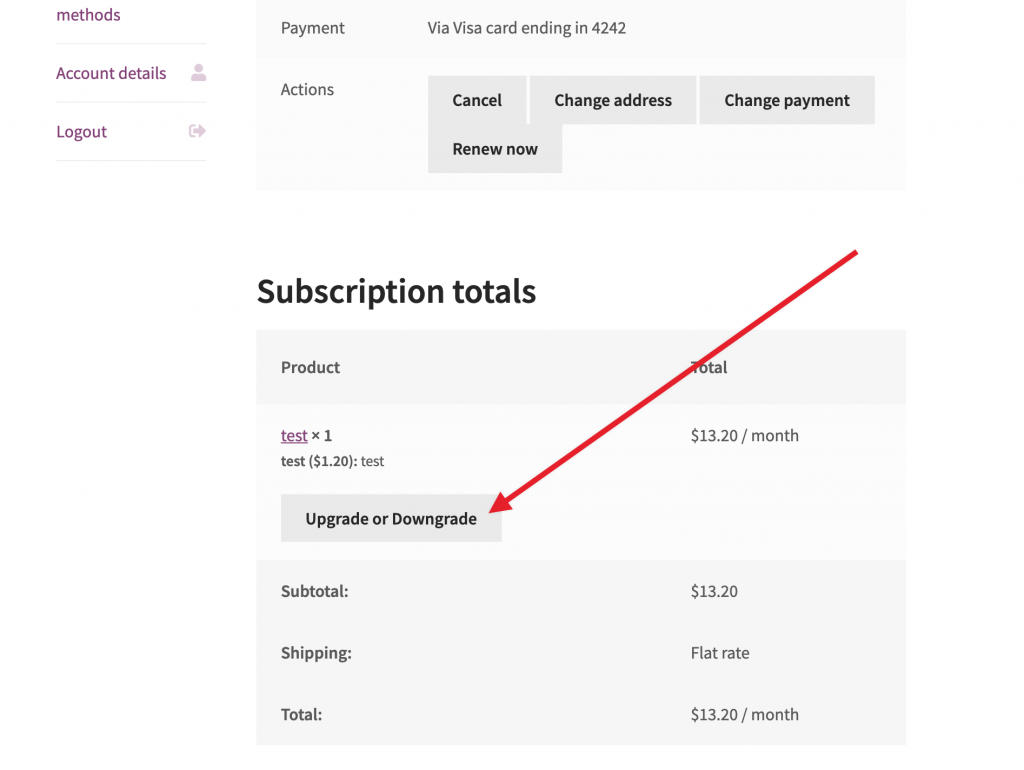
Better Subscription Switching Buttons replaces the default WooCommerce Subscriptions switching interface with a simplified table view that shows clear “Switch” buttons for each available plan. The current plan is clearly marked, and users can switch between plans with a single click.
Currently only works with grouped products.
Installation
Upload the plugin files to the /wp-content/plugins/better-subscription-switching-buttons directory, or install the plugin through the WordPress plugins screen directly.
Activate the plugin through the ‘Plugins’ screen in WordPress
No configuration needed – the plugin will automatically override the grouped product template during a switch
Usage
Create a grouped product in WooCommerce
Add subscription products as child products
The plugin will automatically display the enhanced switching interface on the product page for logged-in users with active subscriptions
In PHP, Exception handling is a process used to manage errors in a controlled fashion. It was introduced in PHP 5 and it has become a standard practice for handling errors in more modern PHP code.
An Exception in PHP is a standard class that can be used to signal that an error has occurred. When an exception is “thrown,” it represents an unusual or exceptional condition that has occurred in the code. It’s sort of like an SOS signal that can be caught and handled with special code known as a “catch” block.
RuntimeException
throw new RuntimeException();
RuntimeException is a type of exception that represents errors which can only be detected during runtime. For example, this could include errors such as trying to access an array element that doesn’t exist, or maybe failing to open a non-existent file. RuntimeException is a subclass of Exception, which is more general.
Exception
throw new Exception();
Exception is the base class for all exceptions in PHP. When you throw an Exception, you’re signaling that there’s a general error condition that you want to handle.
Both of these are followed by the throw keyword, which in PHP signals that an exception is being thrown.
What catches these thrown exceptions?
To catch an exception, you must wrap your code with a try block, and immediately follow it with one or more catch blocks. Here is a simple example:
try { // Code that may throw an exception
    if ( some_bad_condition() ) {
        throw new Exception( "Something went wrong" );
    }
} catch ( Exception $e ) {
    // Handle exception
    echo "Error: " . $e->getMessage();
}
How it works:
The try Block: You enclose the code that might throw an exception within a try block. If no exception is thrown, the code continues normally and any catch blocks are skipped.
The throw Statement: Within a try block, if a condition arises that you cannot handle, you “throw” an exception. You can pass a message to the exception’s constructor, which can then be used later in the catch block.
The catch Block: If an exception is thrown inside the try block, execution stops immediately and jumps directly to the catch block, if there is one that matches the type of the exception thrown. The catch block can then access information about the exception through the caught exception object.
A script can have multiple catch blocks to handle different types of exceptions in different ways:
try {
    // Code that may throw different types of exceptions
} catch ( RuntimeException $e ) {
    // Handle runtime exceptions specifically
} catch ( Exception $e ) {
    // Handle all other exceptions
}
Real-world Example:
Here’s an example from some real code I’m writing. See how I’m using the two different types of exceptions.
private function get_settings(): stdClass {
    $response = wp_remote_get(
        'https://examplewebsite.com/wp-json/custom-plugin/v1/settings/'
        array( 'Accept' => 'application/json' )
    );
    if ( is_wp_error( $response ) ) {
        throw new RuntimeException( $response->get_error_message(), $response->get_error_code() );
    }

    $response_code = wp_remote_retrieve_response_code( $response );
    $response_body = wp_remote_retrieve_body( $response );

    // Check that the response code is a 2xx code.
    if ( ! \str_starts_with( (string) $response_code, '2' ) ) {
        $response_message = wp_remote_retrieve_response_message( $response );
        throw new Exception( $response_message, $response_code );
    }

    // Parse the response body as JSON.
    return json_decode( $response_body, false, 512, JSON_THROW_ON_ERROR );
}

public function init(): void {
    try {
        $this->settings = $this->get_settings();
    } catch ( Exception $exception ) {
        // Optionally error log, output as an admin notice, etc.
    }

     // Continue with plugin initialization.
}
Exception handling is a powerful tool that makes your code more robust and easier to debug since it separates error handling code from the rest of your code logic.
In the future, we won’t buy books. We will buy AI models trained on a specific author or series. These models will be branded and properly licensed, and will be capable of generating infinite numbers of books in a specific style.
Imagine you’re a long-haul space trucker. You’ve just gotten to the end of the last book in your favorite series – the final book of your favorite author. Instead of despairing, you simply prompt your Author™-branded AI to write the next book in the series.
In 2023, someone Used ChatGPT to Finish the Game of Thrones Book Series. While in this case, I’m sure it took a lot of work to get ChatGPT to put out exactly what the user wanted, and it probably required a lot of editing and human intervention to get the plot to carry through, they still did it.
Now imagine if this had been done with the author’s consent, perhaps as part of a lucrative licensing deal. Imagine if the model were trained around understanding what that author feels makes a good plot arc, and were finely tuned to output material that lived up to the standards of this specific human author.
I, for one, welcome the future where a large language model can be trained and tuned well enough to output material that lives up to an author’s standards. And authors should also welcome a future where they can take a slice of the credit and royalties that will come along with it.
I’ve crafted some more free plugins designed to function as mini-extensions for AutomateWoo, an automation powerhouse for WooCommerce sites.
AutomateWoo is basically “If This Then That” (IFTTT), but for WooCommerce. It enables store owners to create powerful workflows to automate emails, rewards, etc., and we often use it as a tool to bulk update WooCommerce Subscriptions.
The following mini-plugins extend the capabilities of AutomateWoo, adding some functions that we’ve used on actual stores.
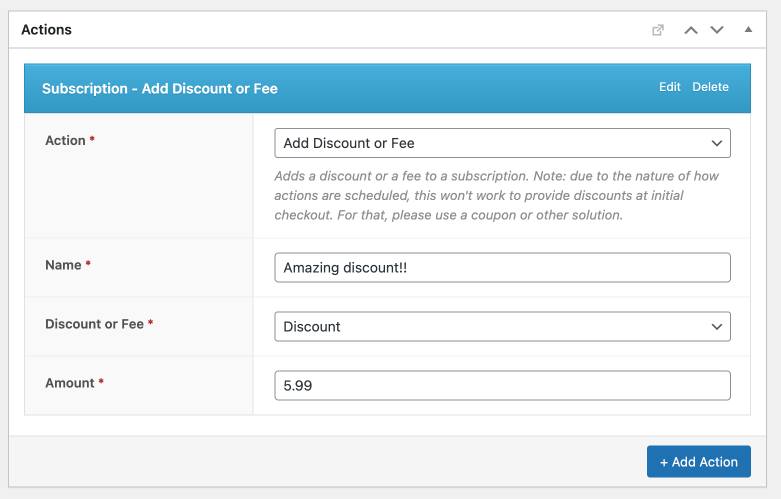
The Subscription Action Add Discount or Fee plugin allows store owners to automatically apply non-taxable discounts or fees to subscriptions after the subscription has already been created. These are added as a “fee” line item on the subscription (not as a discount on individual products).
The Order Rule Recent Failed Orders plugin can help you monitor your store for failed orders. It adds three “Shop” rules which check for failed orders over the last 24 hours, 6 hours and 1 hour. You could use this rule to, for example, email you if you have more than X failed orders in 24 hours, indicating a possible problem with your payment processor.
The Subscription Action Swap Product plugin provides a method for swapping products within a customer’s existing subscription, without triggering any recalculations. It’s a very simple action that essentially just swaps the product IDs of the line items, and doesn’t change any prices, taxes, etc.
The Subscription Action Delay Renewal plugin provides an action which extends out the Next Payment Date (the next renewal) of an existing subscription. For example, you could use this to delay the first renewal by 7 days (a real use case).
The Order Action Add Free Product plugin automates the process of adding a complimentary product to a customer’s order. Due to the way that actions are scheduled with AutomateWoo, this is designed for downstream use – particularly after the order has been completed. This was used by a merchant who wanted to add a specific free SKU to packages in such a way that was invisible to the customer when checking out, but before it made it to the shipping provider.
<?php
add_filter( 'update_plugins_github.com', 'self_update', 10, 4 );

/**
 * Check for updates to this plugin
 *
 * @param array  $update   Array of update data.
 * @param array  $plugin_data Array of plugin data.
 * @param string $plugin_file Path to plugin file.
 * @param string $locales    Locale code.
 *
 * @return array|bool Array of update data or false if no update available.
 */
function self_update( $update, array $plugin_data, string $plugin_file, $locales ) {

	// only check this plugin
	if ( 'your-custom-plugin/your-custom-plugin.php' !== $plugin_file ) {
		return $update;
	}

	// already completed update check elsewhere
	if ( ! empty( $update ) ) {
		return $update;
	}

	// let's go get the latest version number from GitHub
	$response = wp_remote_get(
		'https://api.github.com/repos/your-org/your-custom-plugin/releases/latest',
		array(
			'user-agent' => 'YOUR_GITHUB_USERNAME',
		)
	);

	if ( is_wp_error( $response ) ) {
		return;
	} else {
		$output = json_decode( wp_remote_retrieve_body( $response ), true );
	}

	$new_version_number  = $output['tag_name'];
	$is_update_available = version_compare( $plugin_data['Version'], $new_version_number, '<' );

	if ( ! $is_update_available ) {
		return false;
	}

	$new_url     = $output['html_url'];
	$new_package = $output['assets'][0]['browser_download_url'];

	error_log('$plugin_data: ' . print_r( $plugin_data, true ));
	error_log('$new_version_number: ' . $new_version_number );
	error_log('$new_url: ' . $new_url );
	error_log('$new_package: ' . $new_package );

	return array(
		'slug'    => $plugin_data['TextDomain'],
		'version' => $new_version_number,
		'url'     => $new_url,
		'package' => $new_package,
	);
}
The Result
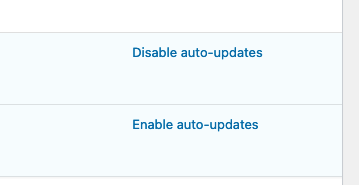
When WordPress checks if there are plugin updates available, the update now shows as being available. If you have auto-updates enabled, then the plugin will autoupdate.
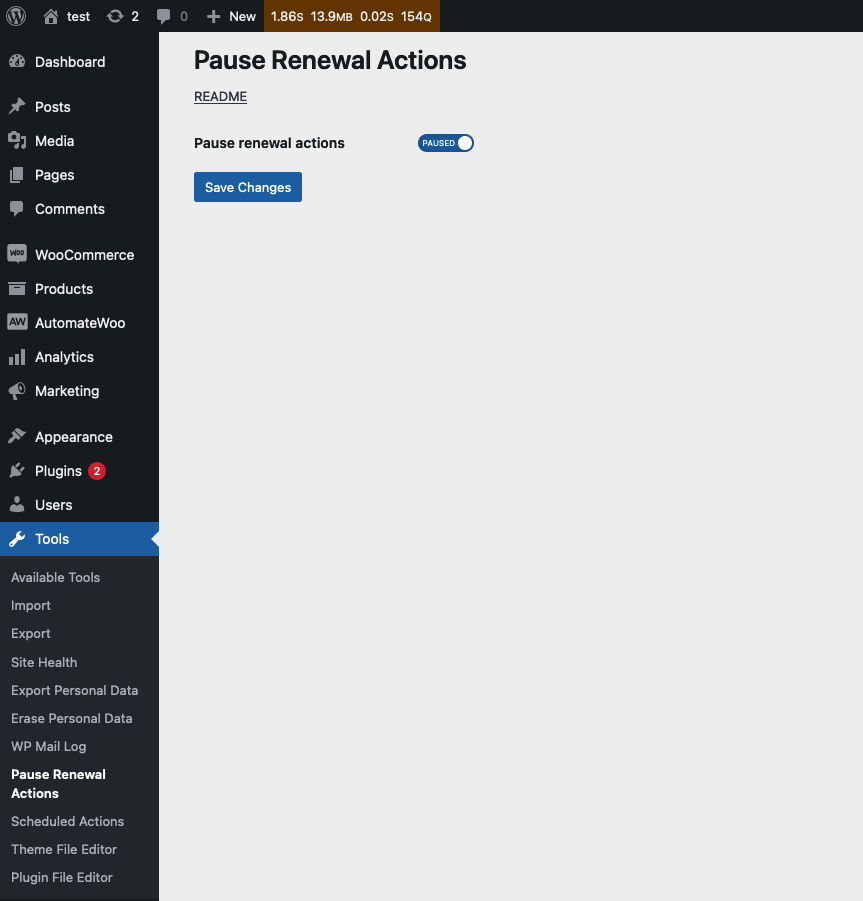
I wrote another free mini-plugin. This one allows a WooCommerce store to pause all WooCommerce Subscription renewals.
Use Cases
There are times when a WooCommerce store needs to temporarily pause all renewals, such as:
They need to catch up on a backlog of shipments before allowing more renewals to run
Supply chain has slowed down manufacturing, and new inventory won’t be in stock for another week
Fulfillment needs to be paused during a holiday
In these scenarios, it would be fairly safe to pause renewals temporarily, and unpause them after a certain period of time.
Details
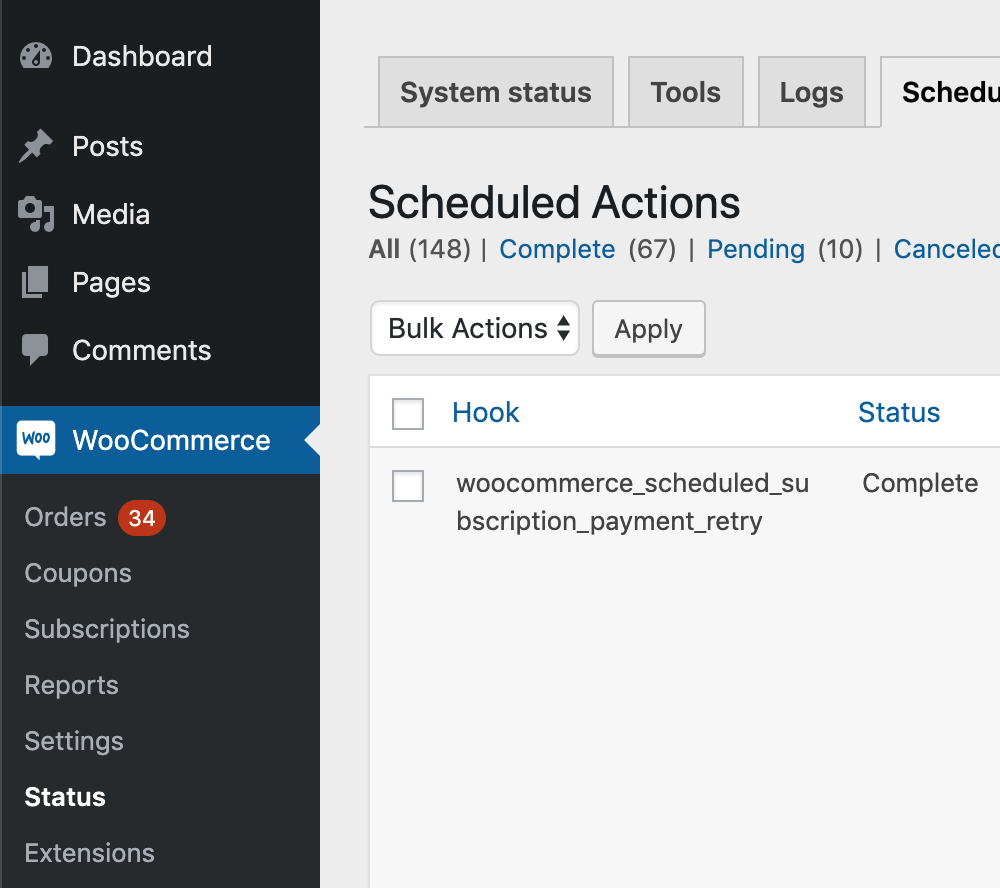
This stops actions with the `woocommerce_scheduled_subscription_payment` and `woocommerce_scheduled_subscription_payment_retry` hooks from being claimed by action scheduler, effectively pausing them.
As soon as they are unpaused, any past-due actions will start to run.
This does not pause any other actions.
This doesn’t work for the old PayPal Standard subscriptions or the WC Pay subscriptions that aren’t associated with the WooCommerce Subscriptions plugin; it only works with subscriptions managed by WooCommerce Subscriptions.
Click the green ‘code’ button, and the ‘Download Zip’ link. You can then upload that zip file to your WordPress site. Go to Tools > Pause Renewal Actions and toggle the option there to pause renewals.
Disclaimer
This plugin is provided with no support or guarantees. Testing/development is done for this, but I’d still recommend doing a quick test on a development site before loading on production, to be sure there aren’t any issues with a specific site. If you have an issue or suggestion, please submit an issue or PR in the repository on GitHub. Thanks for being part of the WordPress community!
I wrote a mini-plugin. It extends the functionality of AutomateWoo with a custom action which allows you to add a free product to an order as a line item.
Intended use
This action is intended for downstream use, such as adding a product to the order after it is created, but before it gets shipped, and the customer doesn’t need to be aware of it while checking out.
This is because the product doesn’t get added to the order until after it has been created, so therefore doesn’t show on the checkout page or the order confirmation page. This means you can’t use it as a replacement for Force Sells, for example, which adds products to the cart before checkout.
I repeat: AutomateWoo runs asynchronously, so you will want to test that the product is added to your orders in a timely enough manner for your purposes.
Also, note that any product added will be added as a free product (price of $0), since it doesn’t make sense to add a cost to the order after it’s been paid for.
This snippet will add a new {product_category} placeholder to the email subject for the New Order email in WooCommerce.
So, for example, when I go to WooCommerce > settings > email > New Order > “manage”, I can have a subject line like this: [{site_title}]: New order - [{product_category}] #{order_number}
We love the plugin autoupdate functionality in WordPress, but we really don’t want them to update on a Saturday night, potentially bringing a site down and messing up our weekend.
So it’s not a specific time, but rather it’s checking a transient to see when it last happened. It’s also not reliant on WP_CRON.
This is good news, because we don’t have to worry about hitting a 12 hour window – it will just check if it’s happened in the last 12 hours and then run if it’s in a predefined window we set.
How do we set time windows for updates?
Method 1: All Autoupdates
Method 2: Plugins Only
Note that this second method respects the autoupdate setting within business hours, so you can still fully disable autoupdates for specific plugins individually.
We ran an automated import from a Tumblr site to a new WordPress site, and all galleries were imported as gallery shortcodes in classic editor blocks, and they all were set to the default 3 columns and showing thumbnail sizes.
We wanted to change the gallery settings on those imported galleries to a single column, and full size.
Filterable Attributes
The gallery shortcode has a bunch of attributes that you can apply to it: https://developer.wordpress.org/reference/functions/gallery_shortcode/#parameters
These are filterable using the shortcode_atts_gallery filter.
This will add a new ‘Recipient’ column to your CSV Export, which will include the user ID of the recipient. After importing into Google Sheets or similar, you can sort by that colum to determine the subscriptions which have a recipient, i.e. which ones have been gifted.
There’s no default way to set a minimum subscription period with WooCommerce Subscriptions, but there are a couple of potential solutions to this:
Sign-up fee and free trial
Let’s say you want a customer to have to pay a minimum amount, and then go monthly after that, you could set a sign-up fee and free trial on the subscription to ensure that the customer pays a minimum amount before being able to cancel.
Hide cancel button until minimum number of payments
Another way to do this is to simply take away the customers’ ability to cancel the subscription until a minimum number of payments have processed. Thanks to jrick1229 for this snippet:
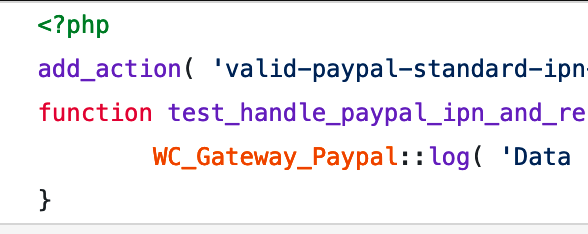
PayPal Standard communicates with your WooCommerce store using IPNs ( and PDT, if you have it set up, but it’s not as common). For the most part, IPNs are still the standard method of sending information back to a WooCommerce store, such as successful charges, subscription renewals, etc.
If you want to capture and log the payload of a PayPal IPN on your WooCommerce store, you can hook into valid-paypal-standard-ipn-request like this:
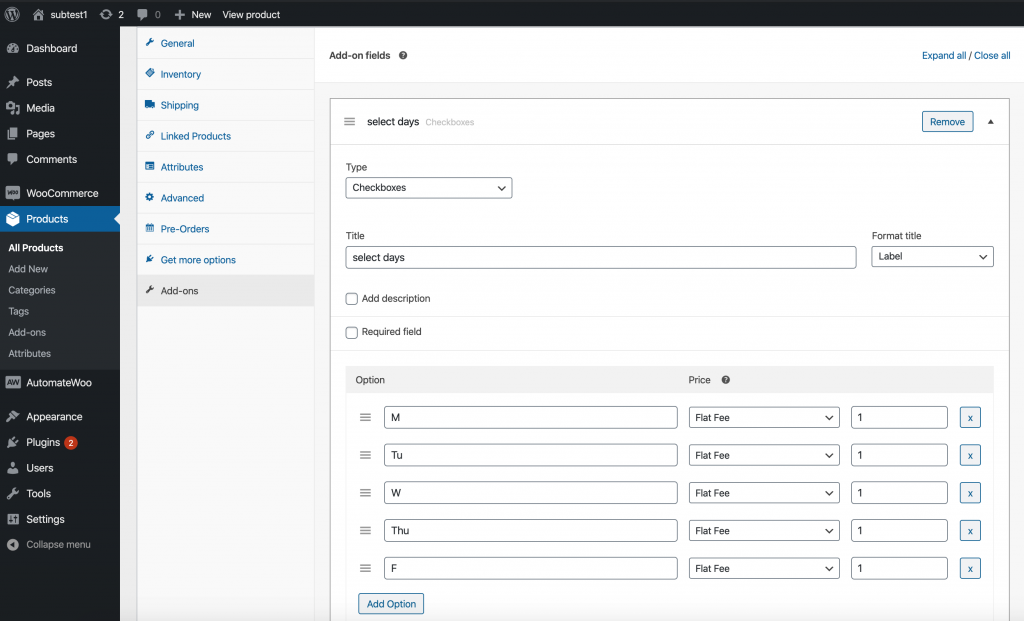
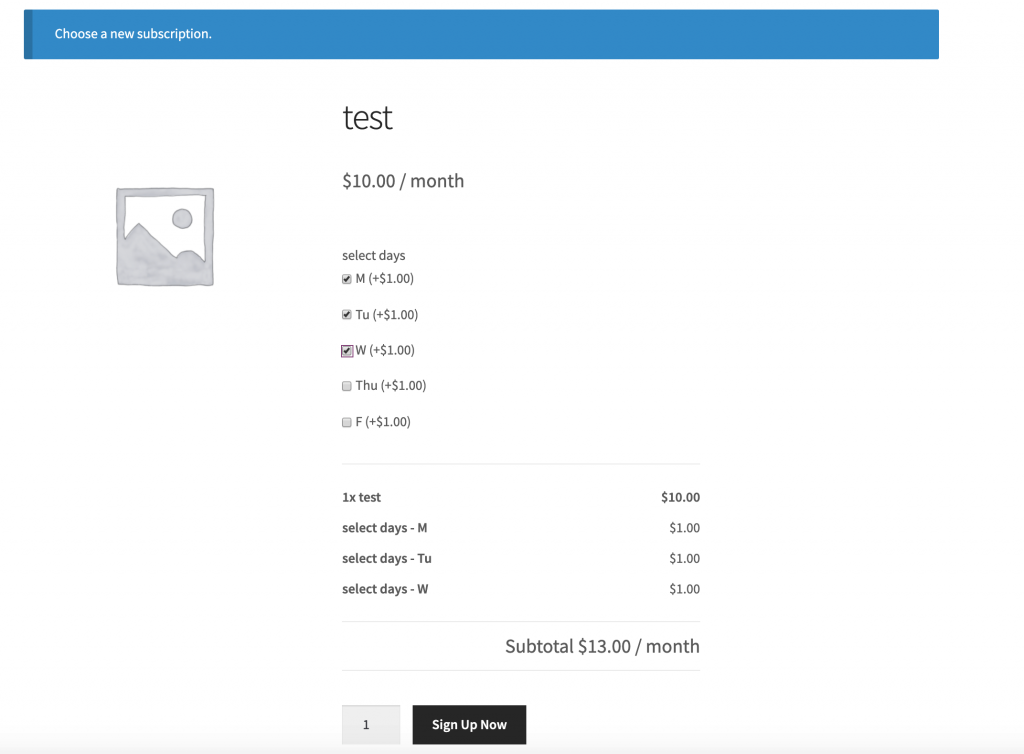
I have a client that is wanting to set up a subscription where the customer would select a product and it would allow them to select one or more weekdays. The cost of the subscription would be the total of the weekdays selected, and it would be a weekly-recurring order. What I’m wondering is if the Product Addons plugin would work with the Subscriptions plugin and allow the customer to go in and update their subscription to change the weekdays? So, they originally select Mon/Wed/Fri and then later on, if they wanted to could change that to Mon/Tue/Wed/Thu/Fri and have the subscription be updated, rather than cancelling and starting a new subscription.
This will change the scheduled action retention period to 14 days (instead of the default 30 days). After your completed actions get down to a reasonable number, you can then remove that filter.
You could also shorten it to one day, wait a day, then remove it.
Clear out pending actions safely
Speed Up Processing
The best approach is to just speed up the processing of actions so that the queue completes.
There are a few approaches for this, from simplest to hardest:
update WordPress, WooCommerce & Subscriptions. Specifically, if Subscriptions 3.0+, WooCommerce 4.0+, and WordPress 5.1+ are running, processing speeds should be much higher than with prior versions. If you aren’t already running those or another plugin that includes Action Scheduler 3.0+, the first step is to update to one of those. If you’re not sure, you can also load Action Scheduler 3.0+ as a standalone plugin: https://github.com/woocommerce/action-scheduler/releases
if the above doesn’t work, because it’s not processing actions fast enough, then it may be necessary to setup WP CLI runners. Two helpful guides on that:
This plugin will still work, but upgrading to AS 3.0+ will give all of the same benefits with the new async queue runner.
Clear out pending actions dangerously (you know what you’re doing)
NOTE: The queries below should be used at your own risk, on a staging site, etc.
Delete Data
If it’s not possible to speed up processing enough to clear the pending actions, then it may be necessary to clear the queue by deleting pending scheduled webhook actions.
This is only safe when you know the pending webhook actions aren’t necessary. For example, reporting plugins like Metorik use Webhooks as a backup data sync method, so they canbe safely synced. Some services will require these webhooks, in which case, it’s not safe to simply delete them.
To delete the actions:
deleting logs and metadata for those scheduled webhook actions
deleting all scheduled webhook actions
The queries to do this:
1. Delete logs for scheduled webhook actions
DELETE lg FROM wp_actionscheduler_logs lg LEFT JOIN wp_actionscheduler_actions aa ON aa.action_id = lg.action_id WHERE aa.status LIKE 'pending' AND aa.hook LIKE 'woocommerce_deliver_webhook_async'
2. Delete trashed scheduled webhook actions
DELETE FROM 'wp_actionscheduler_actions'
WHERE status = 'pending'
AND hook = 'woocommerce_deliver_webhook_async'
Other Helpful Queries
Query to find actions processed in a 1-hour window (update dates to suit):
SELECT hook, COUNT(*) FROM wp_actionscheduler_actions WHERE status = 'complete' AND last_attempt_gmt > '2020-05-08 06:30:00' AND last_attempt_gmt < '2020-05-08 07:30:01' GROUP BY hook
Query to find pending actions in the past:
SELECT hook, COUNT(*) FROM wp_actionscheduler_actions WHERE status = 'pending' AND last_attempt_gmt < '2019-02-08 00:00:00' GROUP BY hook
Customer wanted to offer free shipping on any orders of at least $25. Additionally, they wanted any subscription renewals to charge shipping normally – the free shipping should only apply to the initial order.
To solve this, I’ve suggested using a free shipping coupon, which is applied automatically to the cart if it’s $25 or more. The end result is:
Free shipping on initial cart (if it is at least $25)
Normal shipping charged on any subscription renewals for subscription products purchased.
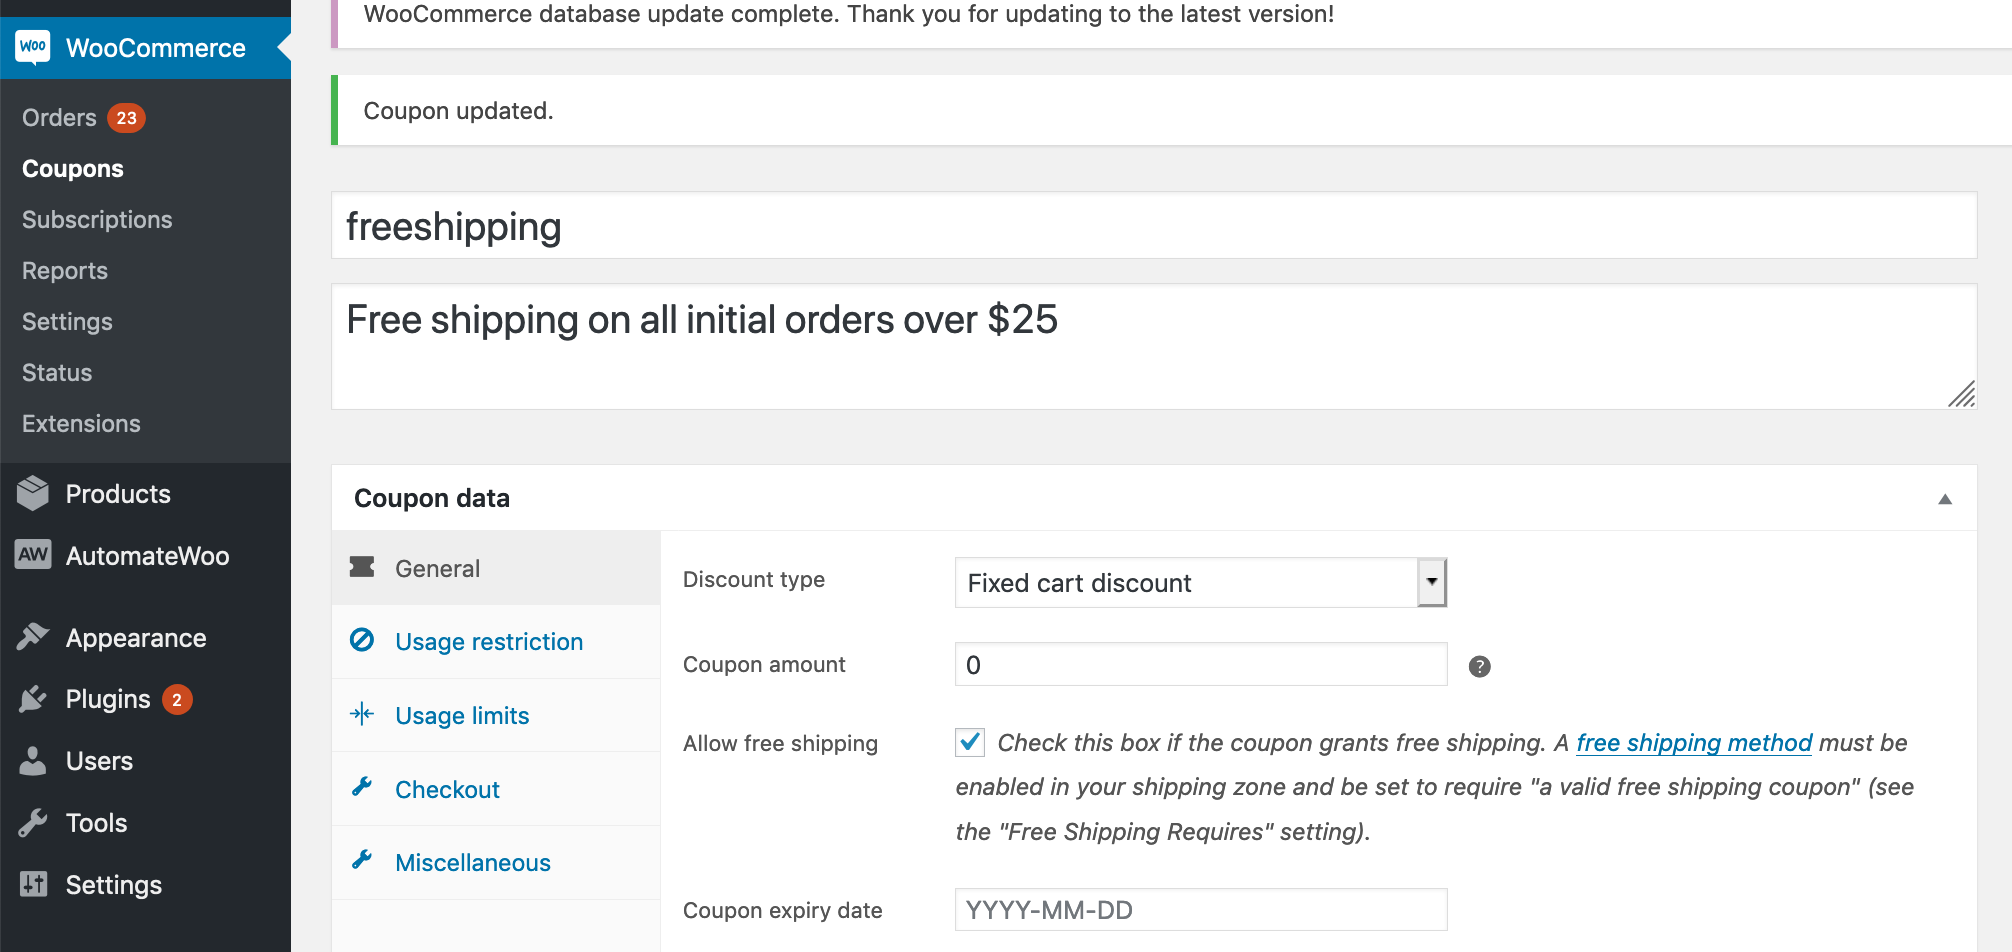
Step 1 – Create Free Shipping Coupon
Go to WooCommerce > Coupons > “Add coupon”
Create a fixed cart discount named “freeshipping”
Set it to a $0 discount, and click “grants free shipping”
Optionally limit coupon to a $25 minimum
Create a freeshipping coupon
NOTE: For free shipping coupons to work, you have to have a free shipping option set in your shipping settings. Be sure to select “Free shipping requires a valid coupon” for this shipping option.
Step 2: Auto-apply coupon
To auto-apply a coupon to the cart without using a 3rd-party plugin, you can add this snippet to your theme’s functions.php file. This particular snippet is set up to auto-apply on all initial orders of at least $25, but it can be edited as needed to conditionally check for quantities, products, etc.
The end result is a free shipping coupon that is automatically applied to the initial order, but not applied to the recurring cart.
Here’s a mini-plugin I wrote which extends the functionality of WooCommerce Subscriptions. It restricts subscription products to a certain number of total active (unended) subscriptions on a site.
Use case: store owner wants products and subscriptions to have a one-to-one relationship, i.e. each product should only be subscribed to once. For example, subscription product is a child to be sponsored, and only one subscriber should be sponsoring that child at a time.
This plugin creates and maintains a list of products that have unended subscriptions associated with them, then makes these products unpurchasable from front end to make sure that the subscription product can only be subscribed to a certain number of times. It doesn’t change ability to check out with product, so that customer can pay for failed order through cart, and manual renewals are unaffected.
Note: This plugin is designed to work independently of the
WooCommerce inventory system, and so inventory should be disabled for
all subscription products, or you may have problems with customers not
being able to pay for failed renewal orders manually.
Go to Plugins > Add New > Upload administration screen on your WordPress site
Select the ZIP file you just downloaded
Click Install Now
Click Activate
How-to
Set Product Restriction
There are two ways to set a product restriction, either storewide or on a product level. Setting a product level restriction is more specific and will override the storewide default. If you set either to ‘0’ or leave them empty, they are considered not set.
Storewide Restriction
You can set a default storewide restriction which will apply to all subscription products by going to WooCommerce -> settings -> Subscriptions (tab) -> Product Restriction
Product-level Restriction
You can also set a product restriction for a specific product by
editing the product, and clicking on the ‘Advanced Options’ tab in the
Product Data metabox. This will set the product restriction on a product
level for simple and variable subscription products. That means that
the restriction applies no matter which variation of a variable product
is subscribed to.
To activate the product-level restriction, you must click the “Activate product-level restriction” checkbox.
If “Activate product-level restriction” checkbox is checked, but the
restriction quantity is blank, then no restriction will be applied to
this product, even if there is a systemwide default set elsewhere.
Renewals and Switching
Renewals and Switches are taken into account when checking if a purchase should be restricted.
Renewals
Automatic renewals are not restricted at all, and should process normally. Similarly, manual renewals will still allow the product to be purchased/renewed through the cart.
Subscription Switching
Switching is accounted for when checking restrictions. When switching
between simple subscription products, the checks still occur as normal.
When switching between variations of the same product, the restrictions
are ignored, allowing the switch to occur.
Visibility
When displaying a product in the catalog or archive pages, this plugin will hide the product if it is restricted, and if the ‘Out of stock visibility’ option is checked in WooCommerce settings -> products -> inventory tab.
Warning Messages
There is currently no way to customize the warning message presented
when a restriction is encountered. Additionally, when product variations
are deemed not purchasable, the default WooCommerce alert box is
triggered, which is not descriptive of why.
For this reason, we recommend you add in some descriptive text to
your product description indicating that it is restricted, and why.
Additional Notes
Restrictions don’t apply retroactively, only to future purchases. In
other words, any given purchase is checked against the current
restriction and current number of active site-wide subscriptions. No
already-existing subscriptions will be cancelled or suspended if you
change the restriction number. Future purchases will be checked against subscriptions that existed before the plugin was activated, however.
Deactivating the plugin will stop the restriction checks, and will
delete the cache. However, the restriction option values (set in the
WooCommerce settings tab or product options) will stay in place in case
you choose to reactivate the plugin in the future.
Troubleshooting
To view the current cache for troubleshooting purposes, navigate to the ‘plugins’ page and click the ‘view cache’ option.
Case 3d printed custom by u/crystalhand using 30% wood filament. Based on these files, edited for BOX switches and TRRS connectors, as well as placing the pro micro holders in slightly different location.
2 Pro Micros
2 RJ9/TRRS connectors
76 BOX Burnt Orange switches
76 Diodes
XDA Keycaps. Mostly from here.
Took a few hours of sanding after this pic. I decided I liked the unstained, unpainted look. It’s homemade, and I want it to look that way.
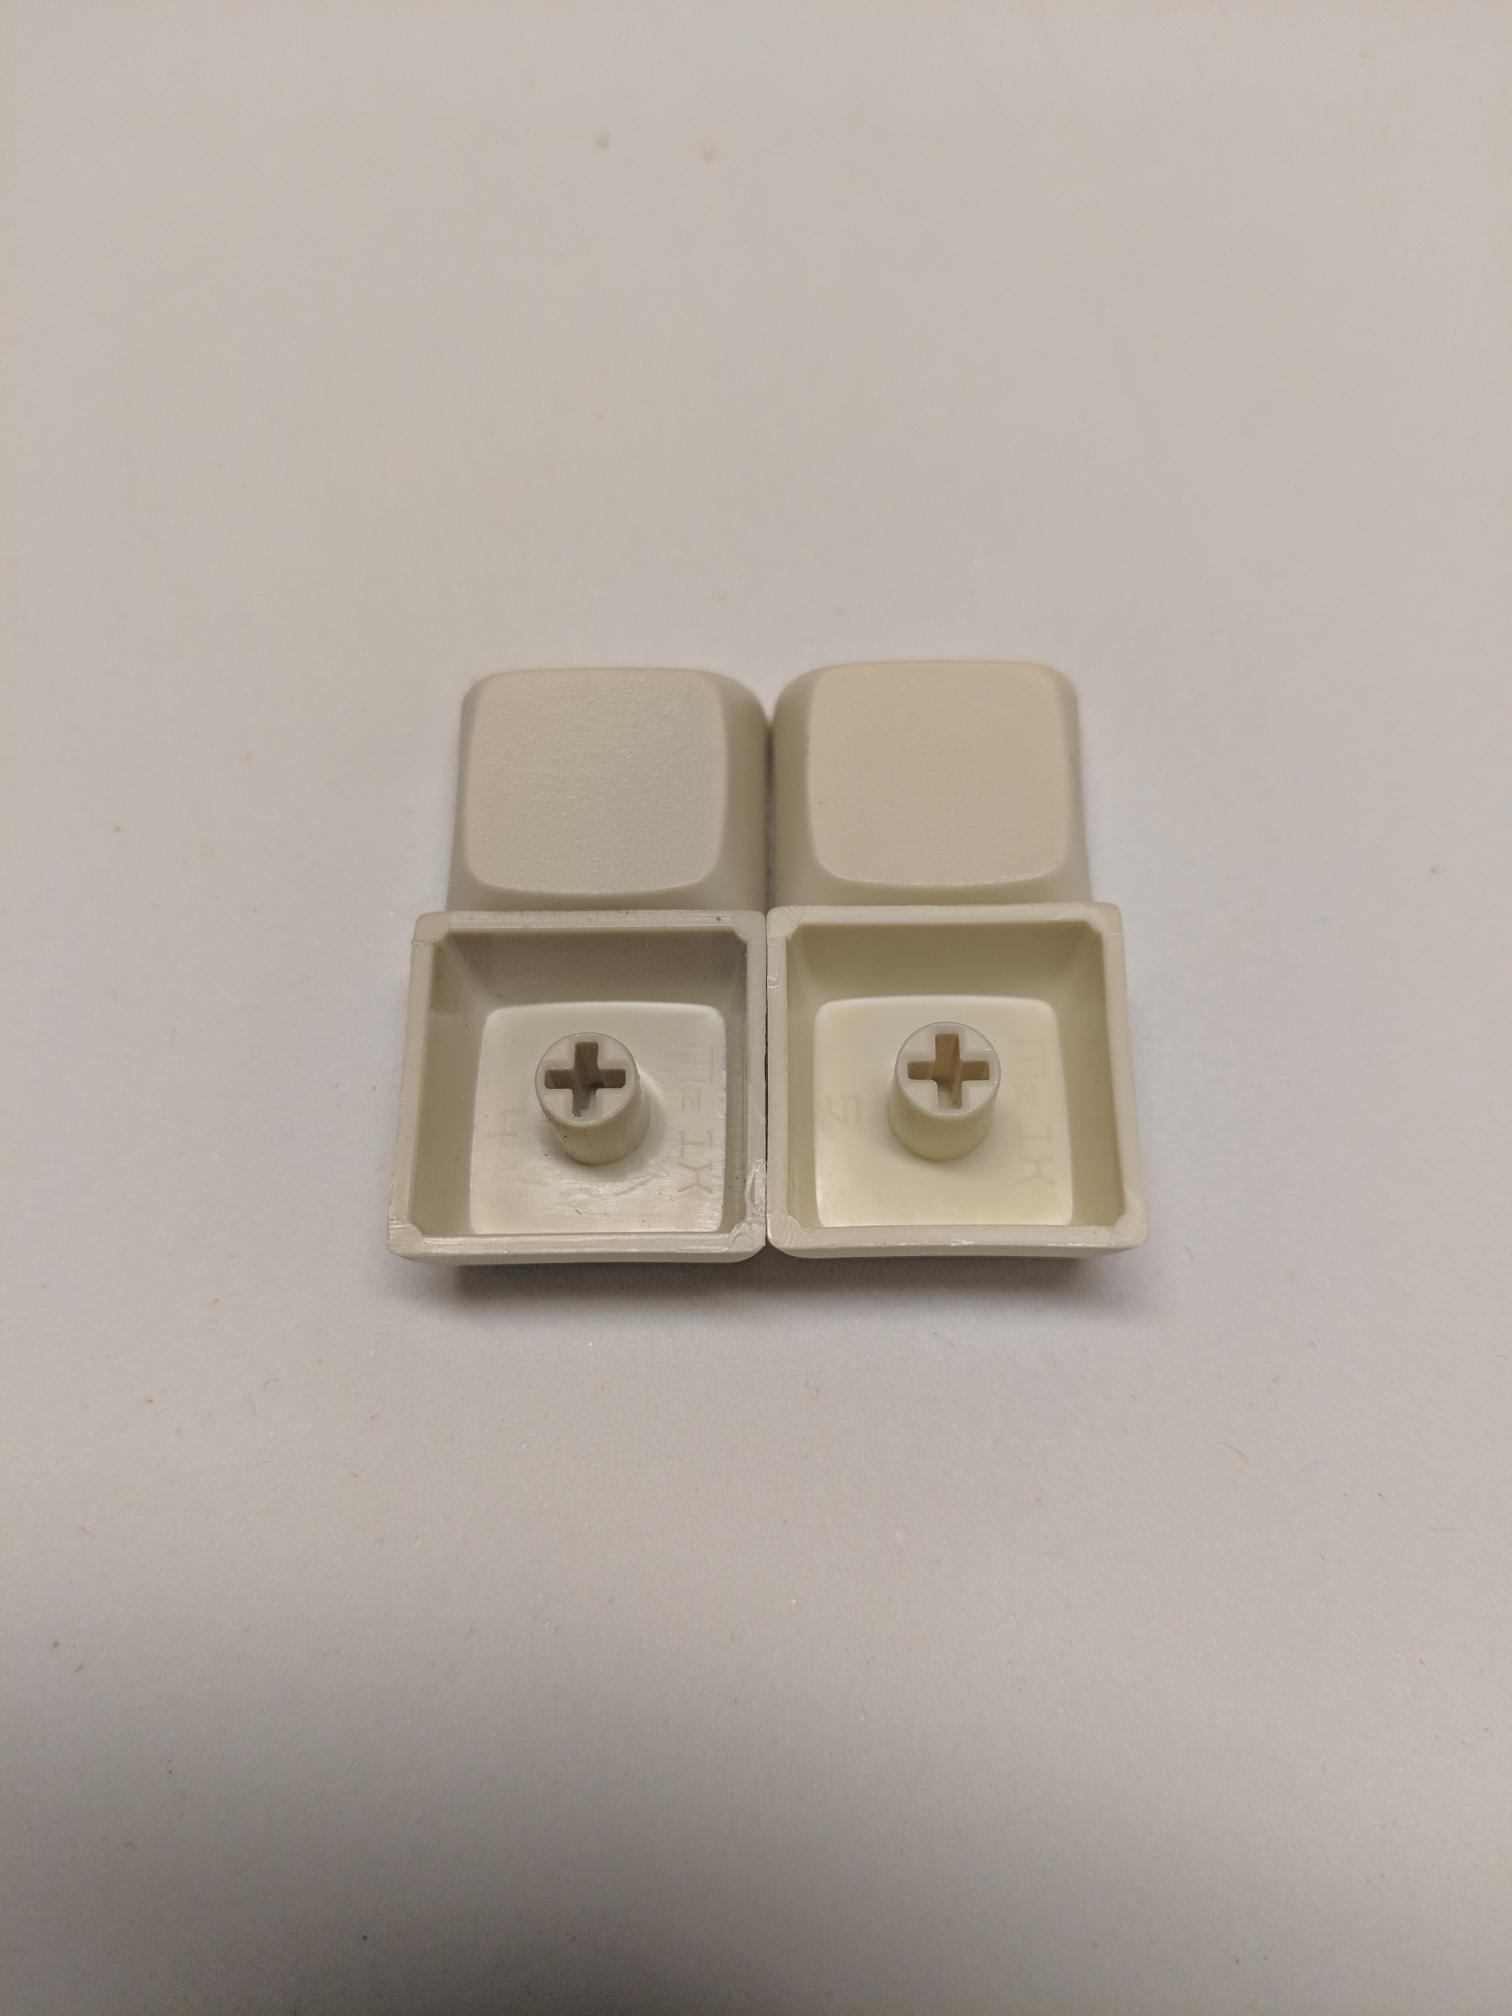
Making sure the keycaps I sourced from a couple of different places were close enough in color. Name brand vs. chinese aliexpress generics. Good enough for me!
Diodes going into place.
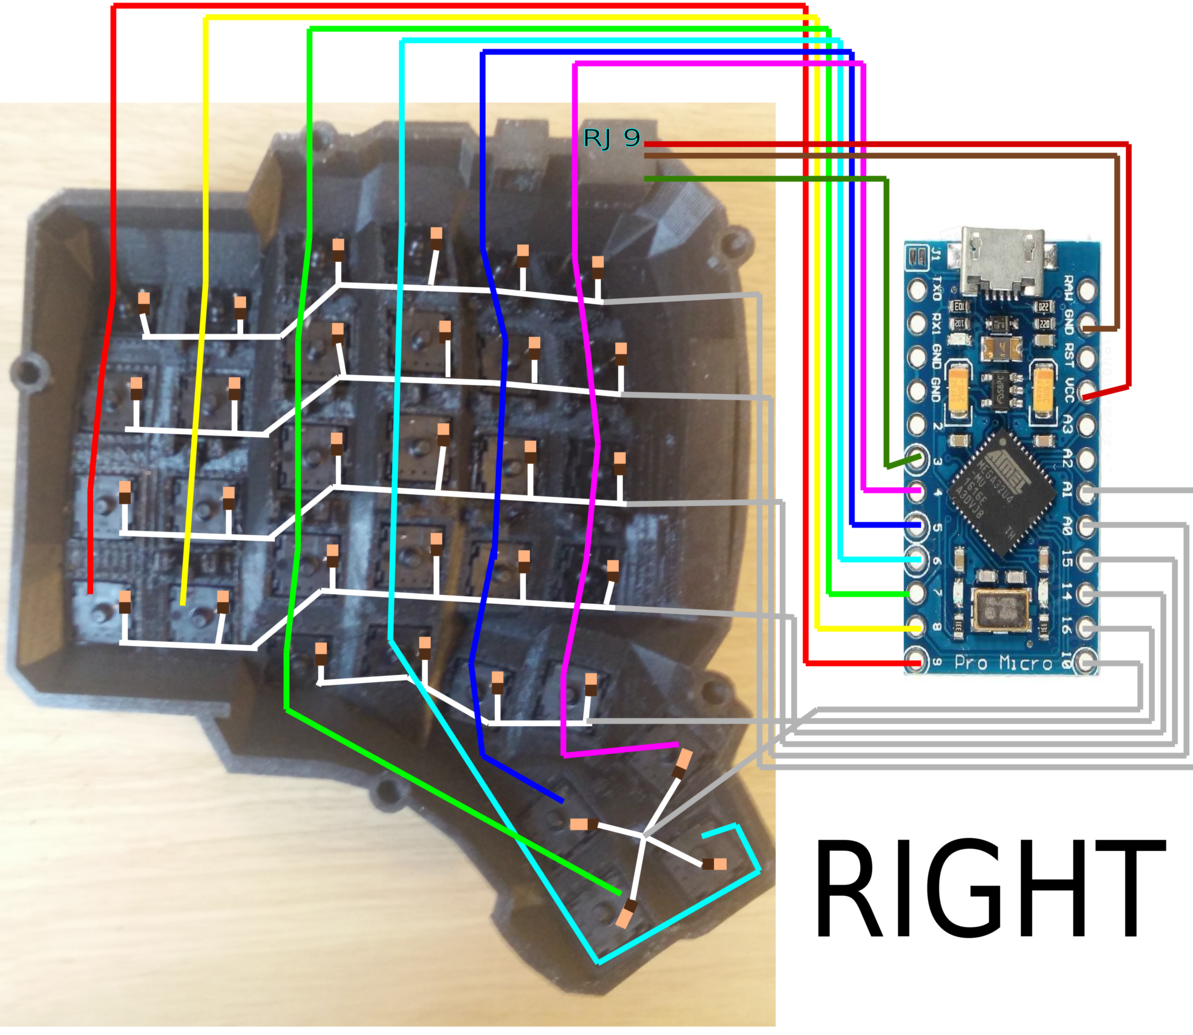
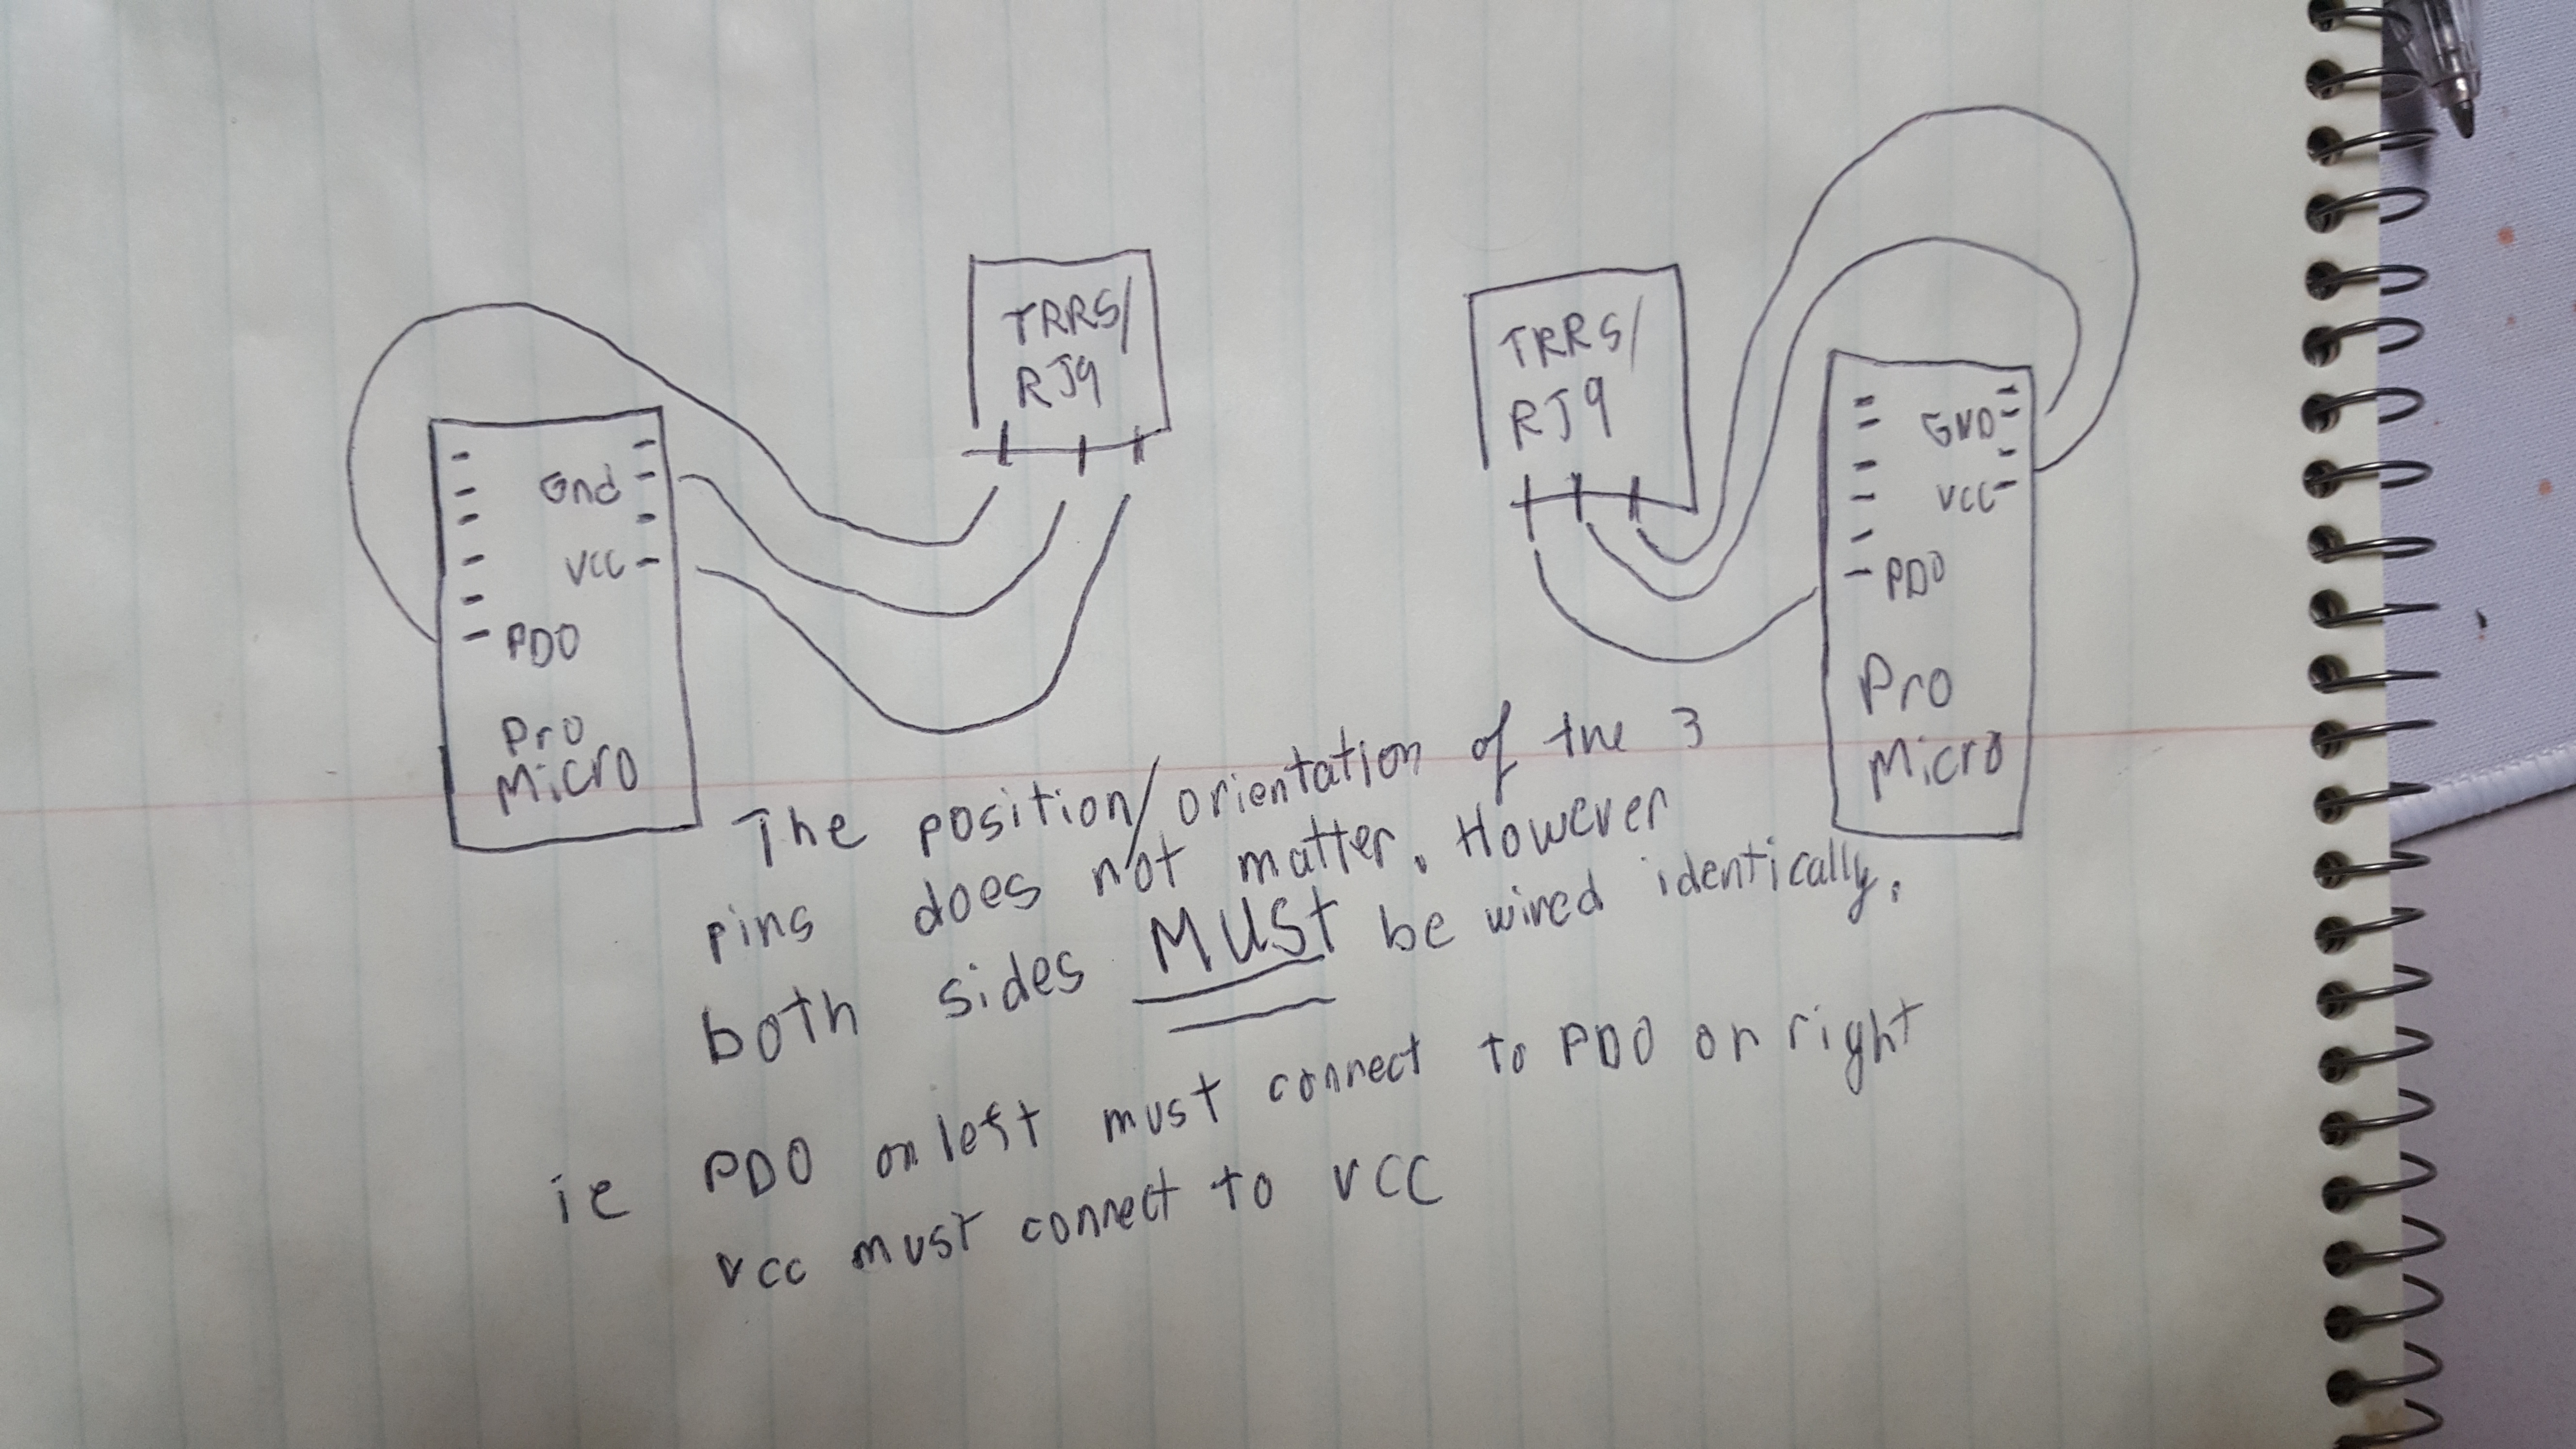
Regarding the RJ9/TRRS connectors: TRRS connectors have 4 pins, but the diagram only shows 3 wires, which means there will be an extra unused pin. Just pick 3 and use them. If you got normal TRS connectors instead, they would only have 3 pins, but the same concept would apply. The position/orientation of which pins you connect to doesn’t matter, as long as they are wired identically. (thanks u/crystalhand) Wiring completed. This is probably 10 hours worth. Yes, I’m slow, but yes, this was my first time handwiring a keyboard and I really didn’t want to frack it up.
Finished Product
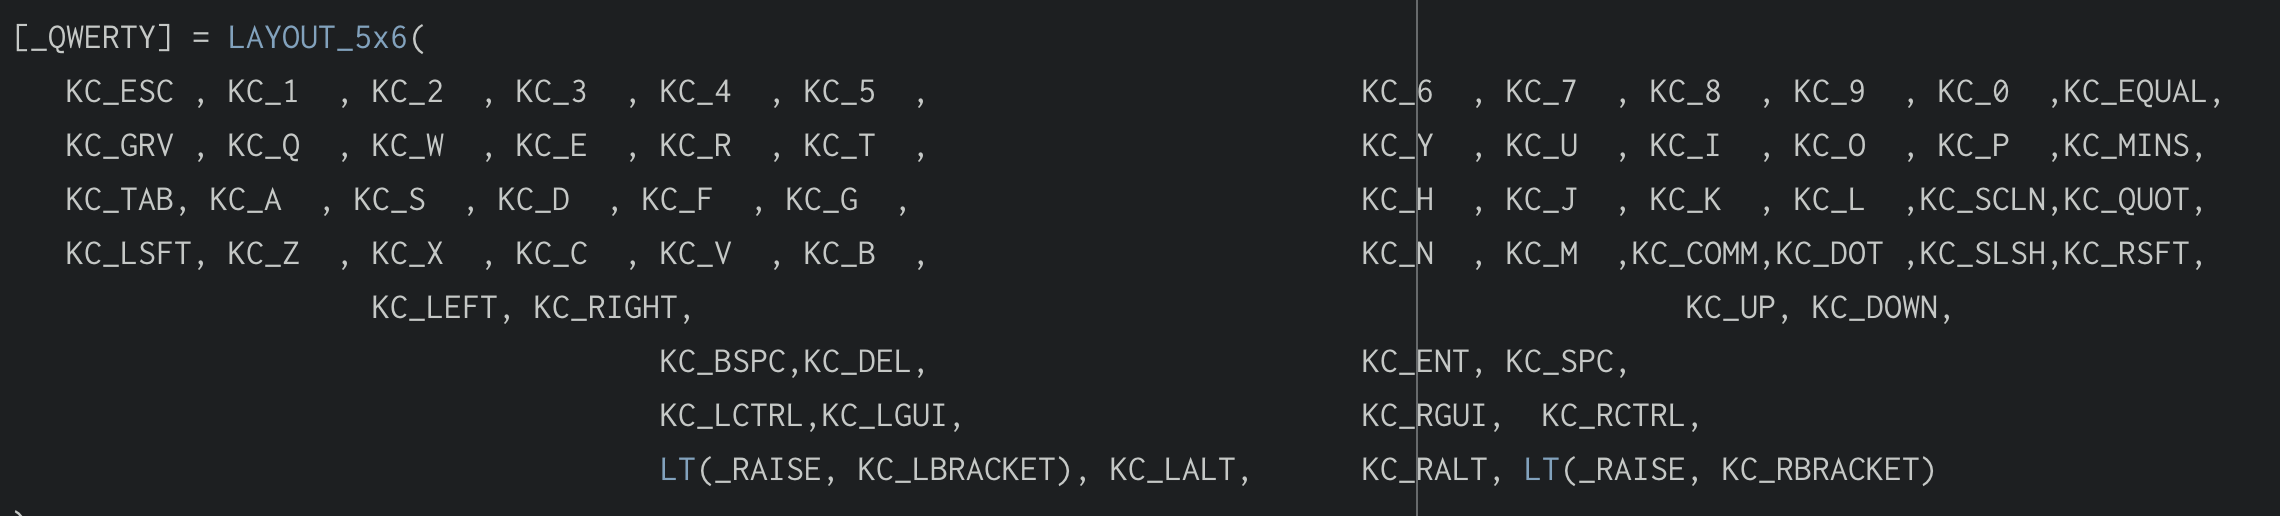
Key Layout
Flashing the Firmware
Start out by downloading QMK toolbox: https://github.com/qmk/qmk_toolbox
Try loading the default hex as shown by the GUI, connect the left half to USB, with both halves connected together. Short the VCC and a GND port to put it in bootloader mode, and immediately hit ‘flash’ in QMK Toolbox. Then, disconnect the left half and flash the right half the same way, with the same file. Then connect the left half again, and you should be getting letters when you type.
Now, to create your own hex. Using the latest release of this repo, I followed these directions: https://github.com/qmk/qmk_firmware/tree/master/keyboards/handwired/dactyl_manuform
(i.e. navigate to QMK firmware folder, and use `make handwired/dactyl_manuform/5×6:default` to generate the hex)
I had to change this bit of code to get it to work properly: https://github.com/technomancy/atreus/issues/34
You may or may not need to do the following to get to this point:
Download Xcode Developer Tools from the MacOS App Store.
Install Xcode Command Line Tools via the terminal.
Install avr with `brew install avr-libc` in terminal, and run various commands to make sure homebrew is updated/upgraded, etc. This may be helpful: https://stackoverflow.com/a/41030599
Checked all the keys with http://keyboardchecker.com/
If you have any keys that don’t register keypresses, try going through and resoldering your connections for those switches. Soaking connections in solder solved my issues with missing keys.
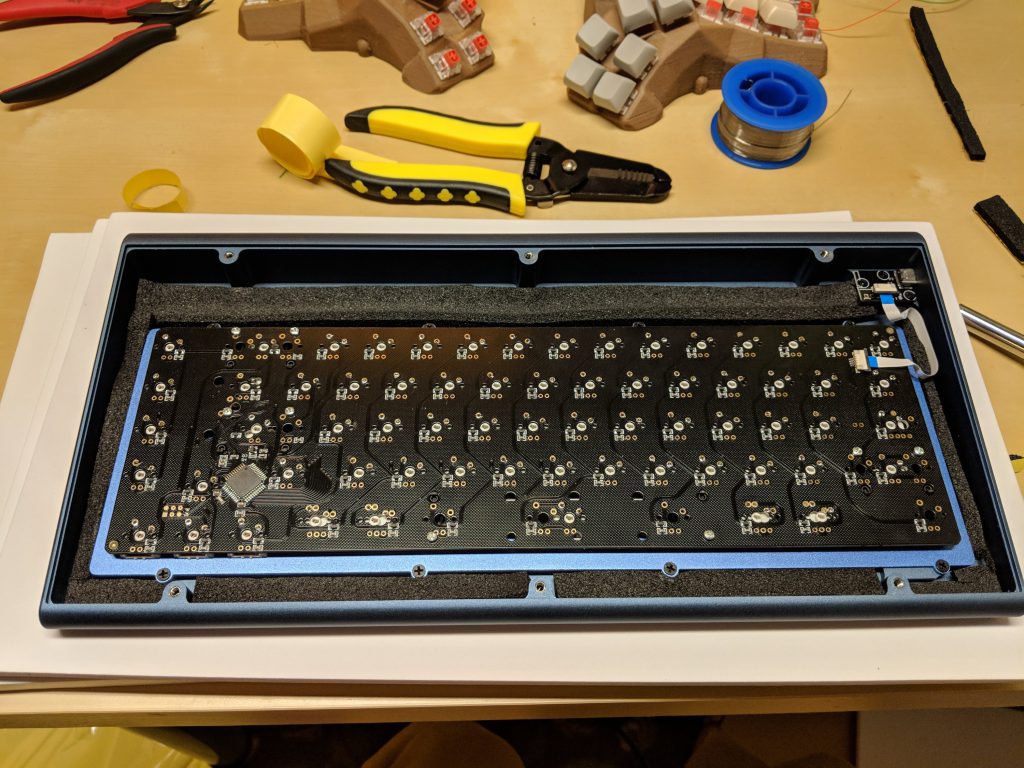
I just finished putting together the CA66 kit. So pretty and retro with SA keycaps.
Caps: SA Dasher
Switches: BOX burnt orange
Things I learned:
CA66 doesn’t work with plate-mount stabilizers, despite having a plate. You have to get PCB-mount cherry stabilizers.
You have to really soak the holes with solder and get it to flow into the hole to get the connection to work properly. I had a few switches that weren’t registering, and I soaked them with solder and they work fine now.
1.75 shifts are sometimes hard to find.
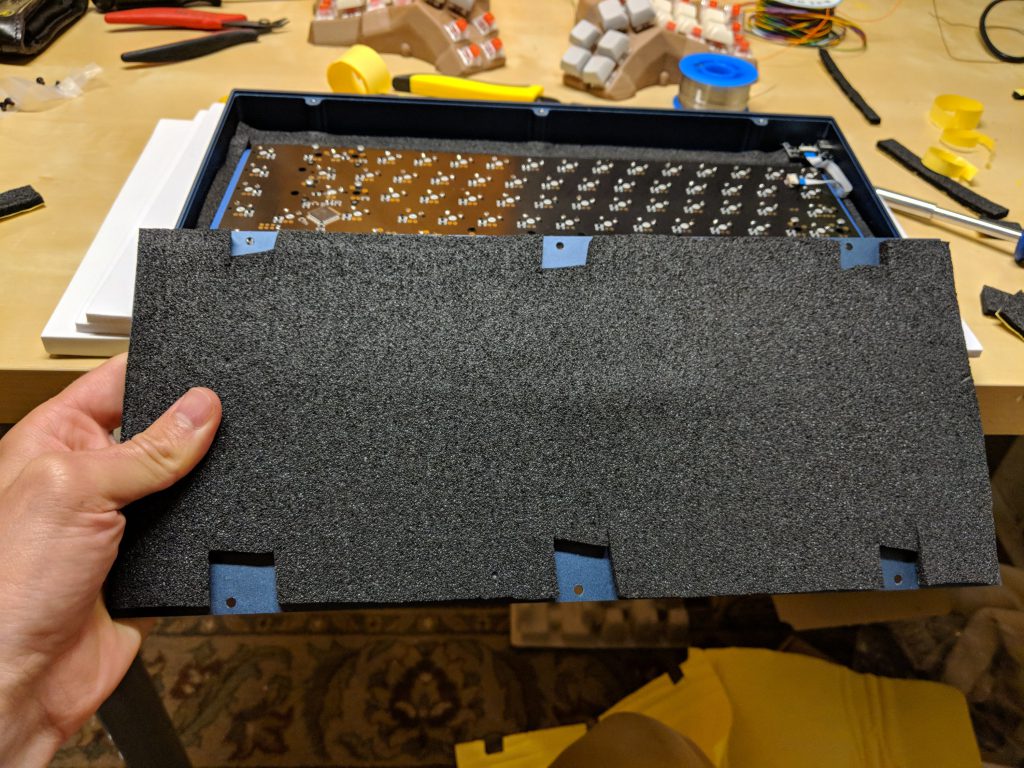
Sound dampening foam for car doors works great for the inside of cases.
The default behavior of WooCommerce is to place orders for physical products in the ‘processing’ status. If you would like to auto-complete all orders with successful payments, including subscription renewals, here’s a free mini-plugin which will do that:
Did you get a pre-built Atreus62 from Profetkeyboards.com with no clue how to edit and re-flash your layout? Here are the steps I took to get it working on a Mac. YMMV:
Determine the path to the keyboard by running some terminal commands. Note: when it says to put your keyboard in bootloader mode, all you have to do is get a paperclip and stick it in the hole in the back of the atreus62. You now have 8 seconds of bootloader mode. (tip: you can also activate Bootmagic)
Flash your hex to the keyboard by putting it in bootloader mode and running the terminal command as shown a little farther down here. For example, in my case, avrdude -p atmega32u4 -c avr109 -U flash:w:atreus62_mylayout.hex -P /dev/cu.usbmodem1411
That’s it! From here on, I can tweak the layout, compile the hex, and flash it.
We recently witnessed some issues occurring when customers using WooCommerce and Subscriptions deleted their payment methods (when they have a credit card “on file”). When they also have active subscriptions using the card they just deleted, most customers don’t realize that they also have to update their card for each of the active subscriptions.
We’ve added a more robust way of dealing with this to the Subscriptions roadmap, but in order to stem the bleeding from the immediate issue, I whipped together a mini-plugin that will pop up an alert whenever a customer deletes a payment method.


 I just finished putting together the CA66 kit. So pretty and retro with SA keycaps.